How to perform a basic scan using Document Capture Pro
Document Capture Pro enables you to quickly scan and create PDF copies of your documents. This article explains how to complete a scan and use some of the features Document Capture Pro has to offer.
To use Document Capture Pro, you need to install Epson Scan on your computer. For information on doing this refer to How to download drivers and software from the Epson website.
|
For information on how to download and install Document Capture Pro for a compatible product, see the following article How do I install Document Capture Pro for my scanner? |
To complete a basic scan, you can find a video tutorial and instructions in the expandable sections below:
Click here to expand video tutorial
This video details how to perform a basic scan using Document Capture Pro:
Click here to expand instructions
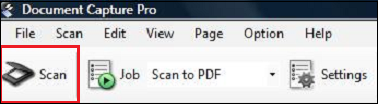
- Open the Document Capture Pro application.
- Load the document into the scanner. See your scanner's user guide for information on loading documents.
- Click Scan.
- In the Scan window you can change settings for the scan, e.g. Document Size and Resolution. When the settings are correct, click Scan.
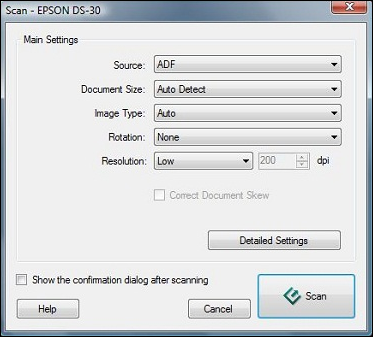
 Note:
Note:The Detailed Settings option will display the normal Epson Scan Window for your product. This can be used to provide more control over the scan settings.
- Once the scan is completed, each page will be displayed as an image allowing you to preview each one before saving the file. The following operations can be used to correct any issues:
- Any pages that require skew or orientation alterations can be altered using the tools highlighted below.

- Page order can be altered using the two arrows while the plus and cross symbols can be used to make additions or remove pages from the file.

- Any pages that require skew or orientation alterations can be altered using the tools highlighted below.
- After confirming the file is correct, click the open folder icon to open the Save As window. Make any required amendments to the settings and click OK to save the file to your computer.
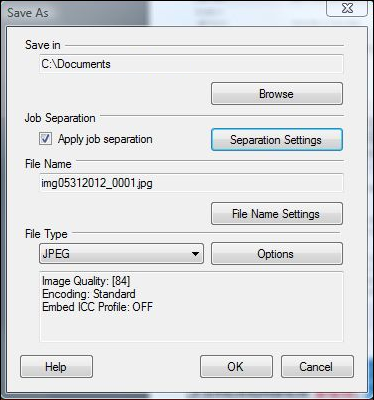 Note:
Note:Selecting Apply job separation on the Save As window activates the function to sort the documents into separate files by detecting blank pages or barcodes inserted between the scanned pages. For further information on this feature, please view the Job Management section of the help guide. To access the help guide, click Help at the top of the window.